
Film photography exposure basics: Why highlights matter
A photograph does not need to preserve every tone. It needs to preserve the tones that carry its meaning.
Receiving a developed roll of film and finding that the sky, a face, a snowfield or a white shirt has turned into featureless white can be deeply disappointing. Highlight detail can disappear when the emulsion receives more exposure than it can hold, leaving little visible texture or shape in the brightest parts of the final image.
So how do you protect bright areas without making the rest of the photograph too dark?
Photographing highlights on film is not about turning every bright subject into middle grey. It is about deciding which highlights must retain texture and which can become pure white as part of the image. Film stock matters too. Colour negative film generally tolerates more overexposure than slide film, which has a much narrower exposure latitude.
What are highlights in photography?
Shadows are the darker areas in a photograph and highlights the brighter parts. A highlight is often associated with a bright area where you still want to see texture or shape, but given the artistic intent, this can also be completely white. More often than not, the highlight might be clouds with visible structure, folds in white clothing, texture across a snowfield, detail in a sunlit face, pale architecture or a bright reflection.
A highlight is not automatically a problem simply because it is bright. The important question is whether losing its detail supports the photograph, more on this later.
In the Zone System, a detailed highlight usually sits around Zone VII. A very bright highlight may fall around Zone VIII, where texture is still possible but more fragile. Zones IX and X move increasingly close to pure white.
These zones are not rules about how every photograph must look. They describe tonal placement and the effects of it.
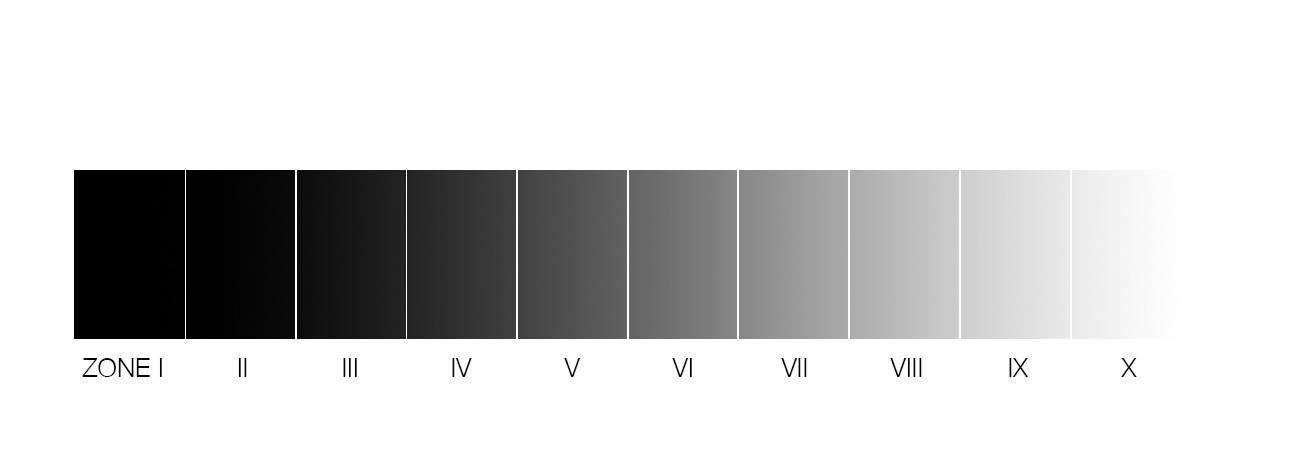
The simplified Zone System for highlights
The Zone System offers a practical way to place important tones within the range your film can record. As explained in my guide to the Zone System [link to shadows article], Zone V represents middle grey, which is what a reflective light meter assumes when it measures a scene or part of it.
Your meter does not know whether it is looking at snow, a black coat, a grey wall or a face. It measures reflected light and gives you an exposure intended to render that area as middle grey. This is why a direct reading from snow can make it appear grey, while a reading from a dark coat can make the rest of the frame too bright. It all highly depends on your meter in your camera and therefore it is important to understand how the meter reads in order to adjust accordingly.
If you meter a highlight directly and follow the reading unchanged, the meter tries to make it middle grey. To keep it bright, place it above Zone V. As a practical starting point, close down approximately two stops from a reflective meter reading taken from the highlight. This places it around Zone VII rather than Zone V.
This is a working reference rather than a guarantee. The result depends on your meter, film stock, development and intended tonal placement.
In case you want to know more about how you can place highlights in zone VII over V then take a look at the exposure triangle, this describes the relationship between aperture, shutter speed and film speed. These settings determine how much light reaches the film, but they do not decide which tone should matter most. That is your decision.
Diffuse and specular highlights
As a rule of thumb, you can ask yourself what kind of highlight we have in the frame and adjust accordingly. A diffuse highlight comes from a surface that reflects light across an area. Snow, white fabric, pale skin and clouds can all contain texture you may want to preserve.
A specular highlight is a direct reflection of a light source, such as sunlight on water, glass, chrome or a wet surface. It may become pure white even when the rest of the exposure is carefully controlled. A direct reflection of the sun does not necessarily need texture. A white shirt often does.

When to expose for highlights
Expose for the highlight when its texture, shape or emotional role matters most.
Highlight-first metering is useful when photographing:
Snow or pale landscapes.
Bright midday scenes.
White clothing in direct sun.
Clouds with important structure.
Reflections being the main subject on water or glass.
Slide film or another film stock with narrow latitude.
Should you meter for shadows or highlights? Meter for the highlight when its texture carries the image or when the film has limited latitude. Meter for the shadow when dark texture is more important and brighter areas can tolerate additional exposure.
Ask yourself:
If this bright area became pure white, would the photograph lose something important?
If yes, protect it. If not, you may have more freedom to expose for another part of the frame.

How to keep detail in highlights
First, identify the brightest area where you want to retain texture. Then take a spot meter reading if possible. Because the meter assumes that area is middle grey, or Zone V, open up approximately two stops to place it around Zone VII. If you want a brighter and more fragile highlight, place it closer to Zone VIII. Opening up two stops with the shutter speed and the original reading V states 1/500, results in needing to half it twice to get more light in. Which results in a new shutter speed of 1/125 to get the highlight in zone VII.
This is a starting point rather than an unbreakable rule. Test the films you use most often because emulsions do not all behave identically.
After placing the highlight, check the important shadows. If they have fallen too far into darkness, reconsider the exposure or accept that the scene exceeds the film’s useful range.
The trade-off with shadows
Protecting highlights can push shadows towards muddy or empty black. After placing the important highlight, take a second meter reading from the shadow that matters most. Compare the readings to estimate whether both tones fit within the useful range of your film and development process.
If the scene is too contrasty, protecting the highlight may mean accepting darker shadows. This is not necessarily an exposure mistake. It may be the correct decision for the photograph and its artistic intent.
For example, a portrait in strong sunlight may contain a bright white shirt and a face in shade. If the shirt carries the composition, protect its folds and accept a darker background. If the face carries the emotional meaning, preserve the face instead, even if the shirt loses detail.
If your main concern is losing texture in dark areas, read my guide to photographing shadows on film.
A personal example: exposing for the highlights
When I made the gondola photograph below, I was drawn to the brightness of the clouds and the snow-covered mountains disappearing into the distance behind them.
The clouds were the important highlight because I wanted them to remain light while holding their texture. I used the camera’s meter as a starting point and estimated the exposure I needed. My intention was to place the highlights around Zone VII, bright enough to give the image atmosphere while retaining detail.
The darker areas still held texture because they were not dark enough to become murky. The scene’s contrast remained within a useful range for the film and process I was using.
The final photograph is bright, but the clouds and shadows retain enough detail to give it depth. The exposure was not about making the whole frame “correct”. It was about protecting the brightest part of the scene that carried the photograph, then checking whether the remaining tones supported the image.

Film latitude and beautiful highlights
Film can produce beautiful highlights because negative film often moves gradually towards its brightest tones rather than clipping abruptly. This can create a softer transition than a sharply clipped digital highlight.
Film cannot preserve unlimited detail. With negative film, the brightest parts of the subject create the densest areas on the negative. As exposure increases, those areas become denser until the scanner or enlarger can no longer distinguish useful differences. Additional exposure then moves the area closer to featureless white rather than creating more detail.
The final appearance depends on film stock, exposure, development, scanning and printing. Colour negative film often gives more room in the highlights, while slide film has a much narrower latitude. Black-and-white film also varies according to its emulsion and development.
Rather than relying on general claims about film latitude, test the films you use most often. Photograph a bright surface, a middle tone and a dark area. Record the film, exposure, development and final output.
High-key photographs and deliberate white
A high-key photograph is built mainly from bright tones, light backgrounds and relatively limited shadow density. Snow, pale interiors, bright clothing and softly lit portraits can all create high-key photographs.
A high-key image does not automatically mean every highlight is overexposed. Some preserve detail throughout their brightest areas. Others allow selected highlights to become pure white for a simpler, more atmospheric result.
A bright window, sunlight breaking through clouds, snow used as an abstract shape or a strong reflection may benefit from lost detail. Accidental clipping can weaken an image, while intentional white can shape mood, suggest memory or draw attention elsewhere.
I rarely let highlights blow out because it is not usually the look I want, but that is a preference rather than a universal rule.

A field routine
Identify the brightest important area.
Decide whether it needs texture.
Meter it, using a spot meter if possible.
Place it around Zone VII or VIII.
Meter the most important shadow.
Compare the readings.
Decide what matters most if both tones do not fit.
Change the composition, wait for different light or use a reflector or diffuser if possible.
Record the exposure and film stock.
In portraiture, a reflector or diffuser can bring shadows closer to the highlights and reduce contrast.
From theory to photographing
In theory this all sounds easy, until you are in the field. What should retain detail, what is the main subject and how do you measure for the subject. Translate the numbers into visual questions:
Do the cloud need structure?
Does the white shirt need to show its folds?
Is it a photo about a person and should be recognisable?
Is the snow a major part of the photo?
If some areas are overexposed is the lost detail helping the photograph?
Practise by photographing one bright subject and one darker subject in the same frame. Compare the developed result with your intention and notice where the highlights land. With repetition, you develop an instinct for how different films respond to shadows and light.
Exposure is not about preserving everything. It is about preserving what carries the image, what is in line with your artistic intent.
If your main concern is losing detail in dark areas, read my guide to photographing shadows on film. This article focuses on protecting bright areas, while the companion article explains how to preserve texture in the shadows.
This week, make a photograph with one important highlight and one important shadow. Then send it to my email with your thoughts. We can look at whether the highlight retained its texture and whether your exposure supported the story you wanted to tell.


