Why Scan Panoramic Film
Seeing a negative turn into a positive in the darkroom is magical. Yet that magic comes at a steep price. The closest you can get to that feeling, for a fraction of the cost, is watching the same transformation happen on a laptop. There’s still something special about seeing the image slowly reveal itself before your eyes.
Scanning panoramic film is an affordable and practical way to create digital copies of your images, especially when using a DSLR or mirrorless camera. Developing film, maintaining an archive, and keeping enough stock on hand can get expensive. I try to minimise unnecessary costs and optimise for time wherever possible.
I know that not every roll of film that I shoot will be good enough to print. Therefore it makes sense to digitise 35mm film negatives at home first before investing in professional scans for large prints. Most digital cameras produce files of high enough quality for large prints. When scanning yourself and converting the negatives yourself, you can also decide on the exact level of quality you want to achieve.
This is therefore a very pragmatical and rewarding approach to scanning film. The negatives transform in front of your eyes to the positive. Each frame becomes a tangible memory of a long-gone moment or trip.

Handling Negatives After the Lab
Each frame becomes a tangible memory of a long-gone moment or trip. Even the best labs make mistakes unfortunately. For that reason it is important to inspect your film after you got it back from the lab. I once paid a high price for professional development, only to receive a scratched roll in return.
Therefore never assume that the film is flawless. There are compensations and additional services that you can ask for when this happens.Scratches can’t be removed, but rinse marks or residue sometimes can. In such cases, labs might offer re-washing or digital scans with retouching.
My worst nightmare once happened, the lab automatically cut the film to fit in sleeves, despite written instructions not to, and sliced right through 2 of my panoramas. Irretrievable, gone for good. Always confirm your preferences in writing.
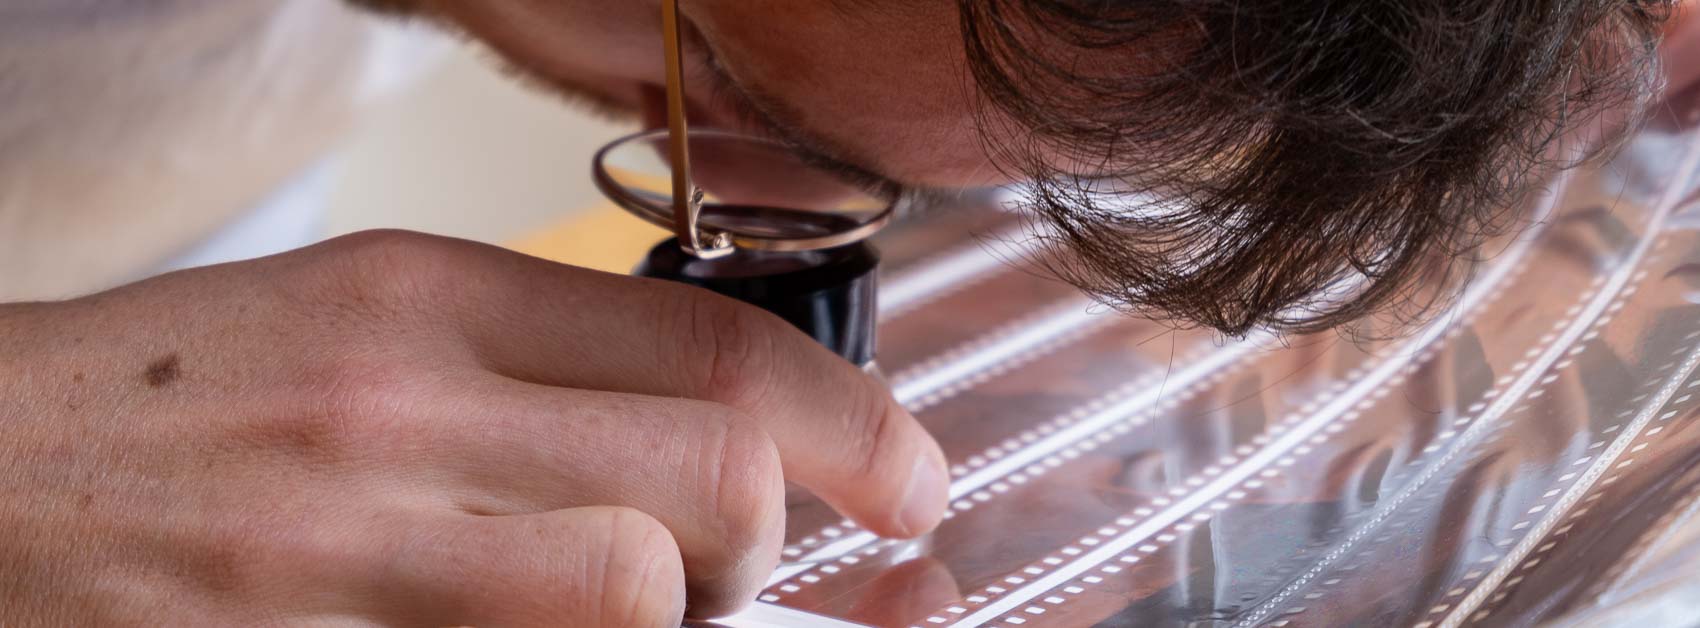
When handling film take the necessary precautions. Use gloves when you need to hold the film, insert the film in sleeves after scanning them and hold the film by the edges at all times, even when wearing gloves. The emulation of the film is still sensitive to touch and when you don’t grab it by the edges the protective layer on top of the film might get damaged, resulting in the film deteriorating faster over time.
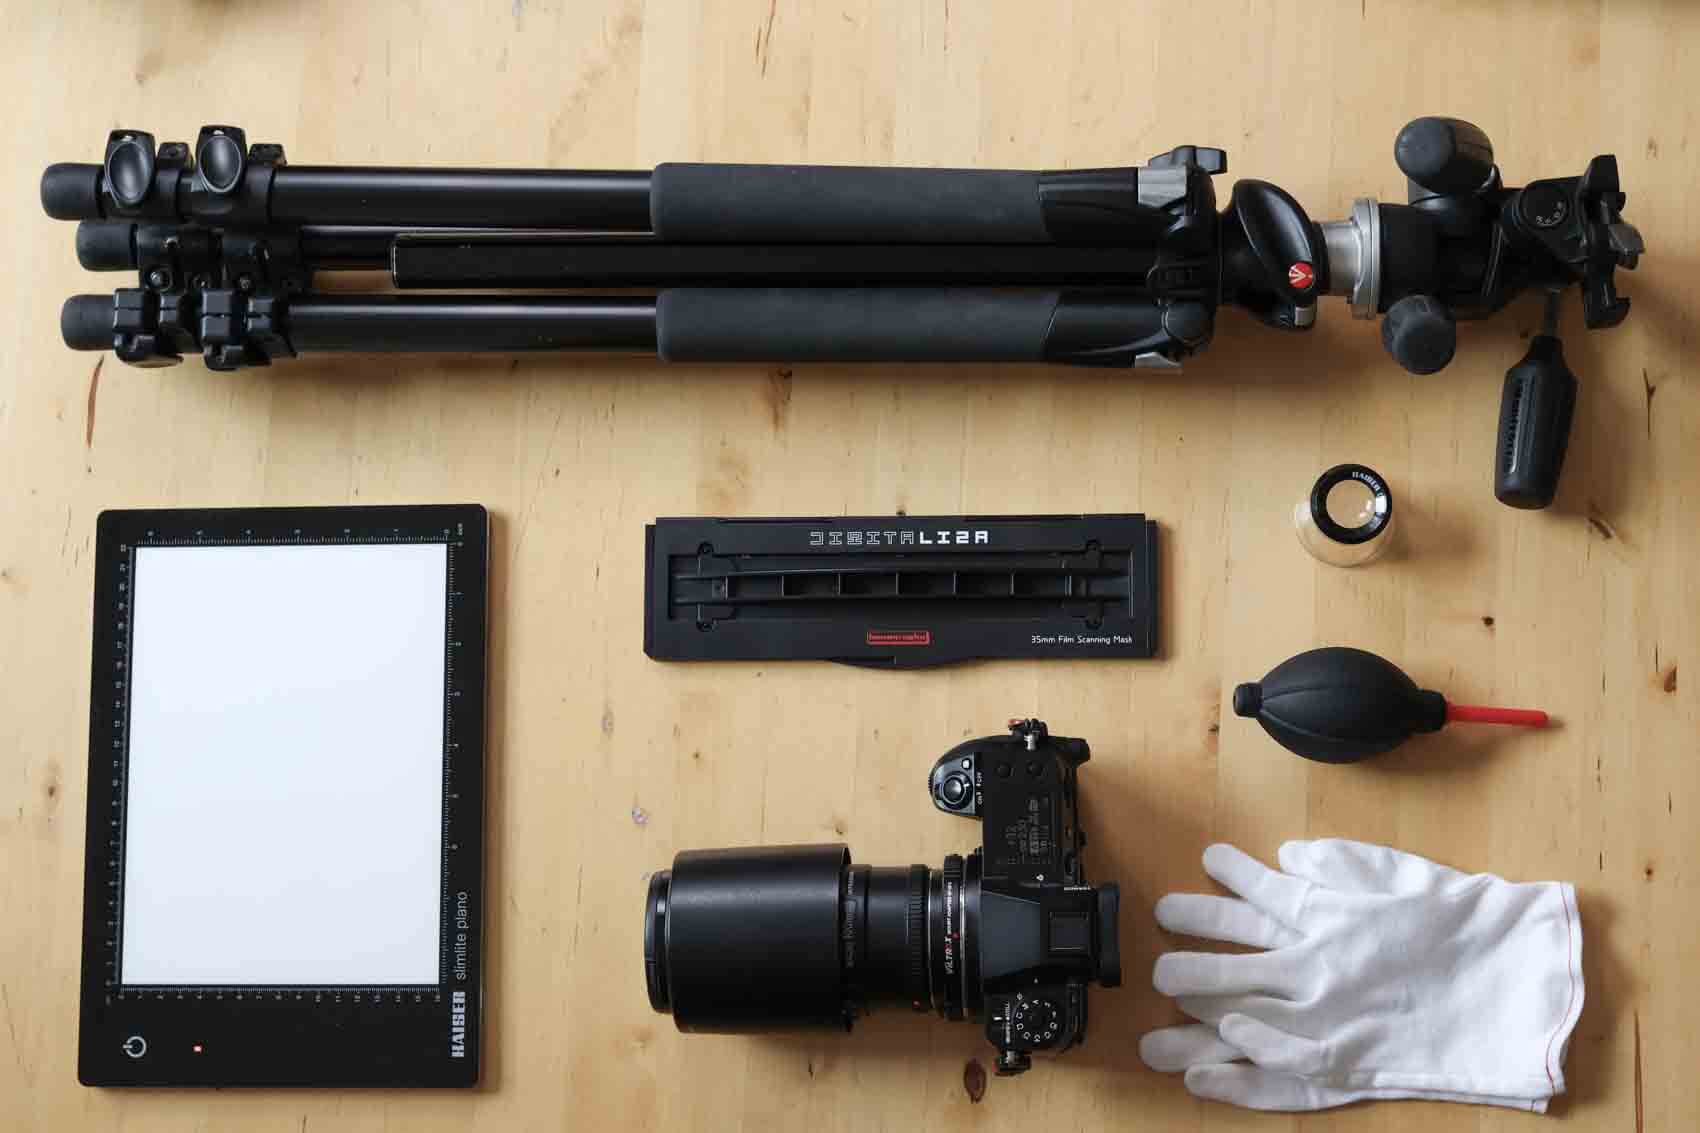
Essential Gear for Scanning Film with a DSLR or Mirrorless Camera
When scanning 35mm film with a digital camera, a few essentials make all the difference:
Digital camera with macro lens -A macro lens allows close focusing for high-quality scans..
Lightbox (CRI, even lighting) - Use a light source with a CRI above 90 for accurate colour reproduction.
Film holder options (commercial vs DIY) - There are many different film holders available and probably all will work well enough, whilst some are preferred by most. The film holder elevates the film from the Lightbox removing the possibility of Newton rings to exist whilst scanning. Additionally it will also hold your film flat. Personally I use the Lomography DigitaLIZA 135 Film Scanning Mask. A good mask is necessary to make sure the longer panoramic frames curve less.
Tripod or camera stand for stability - Provides stability and consistent distance from film to camera.
Accessories - Gloves, microfiber cloth, and an air blower help maintain a dust-free setup and reduce post-processing work.

Preparing for the Scan: Cleaning & Setup
Before scanning, it is important to clean the setup and the film. The dust particles not easily visible to the eye will be very visible on the digital scan. For that reason clean the negatives with a blower or anti-static brush. Although the latter should be done carefully to prevent damage to the emulsion layer.
Wipe or blow dust from the light box. The more dust you remove before you take the photo the less work your negative might require when you have scanned the film. It might not feel important, but cloning the dust and hairs out of photo can become quite tedious, therefore I highly recommend cleaning negatives as much as possible before scanning. Additionally, cloning out dust digitally can degrade the image if not done carefully..
Then when setting up the film, you will have to make sure the film is flat in the holder. Ensure your film lies perfectly flat in the holder. When film bends and touches the glass, light gets trapped, creating interference patterns called Newton rings. To avoid this, make sure your film does not touch the lightbox surface.

Scanning Process: Step-by-Step Guide
Set your camera to RAW format for the best results. Use the lowest ISO to minimise noise, a shutter speed around 1/2 second, and an aperture of f/11 for sufficient depth of field. Match your white balance to your light source, mine is 5000K using the Kaiser 2453 Slimlite Plano LED panel.
To avoid camera shake, use a remote trigger or a 2-second timer. Once you’ve dialled in your settings, they can easily be reused for future rolls.
In short:
ISO 100 (or another base ISO depending on your camera)
F11 (for enough depth in case your film is curving)
1/2 sec shutter speed
White balance set to 5000K (or different depending on your light box)
Shoot RAW
2 second timer
Whilst all of this is applicable to any type of film, there is a trick to get higher quality photos. Take multiple images of the panorama to completely cover the entire width of the panorama and then stitch them together. By doing this, you can significantly increase the megapixel count of your image. Which is often harder to do when shooting a single 3:2 frame.

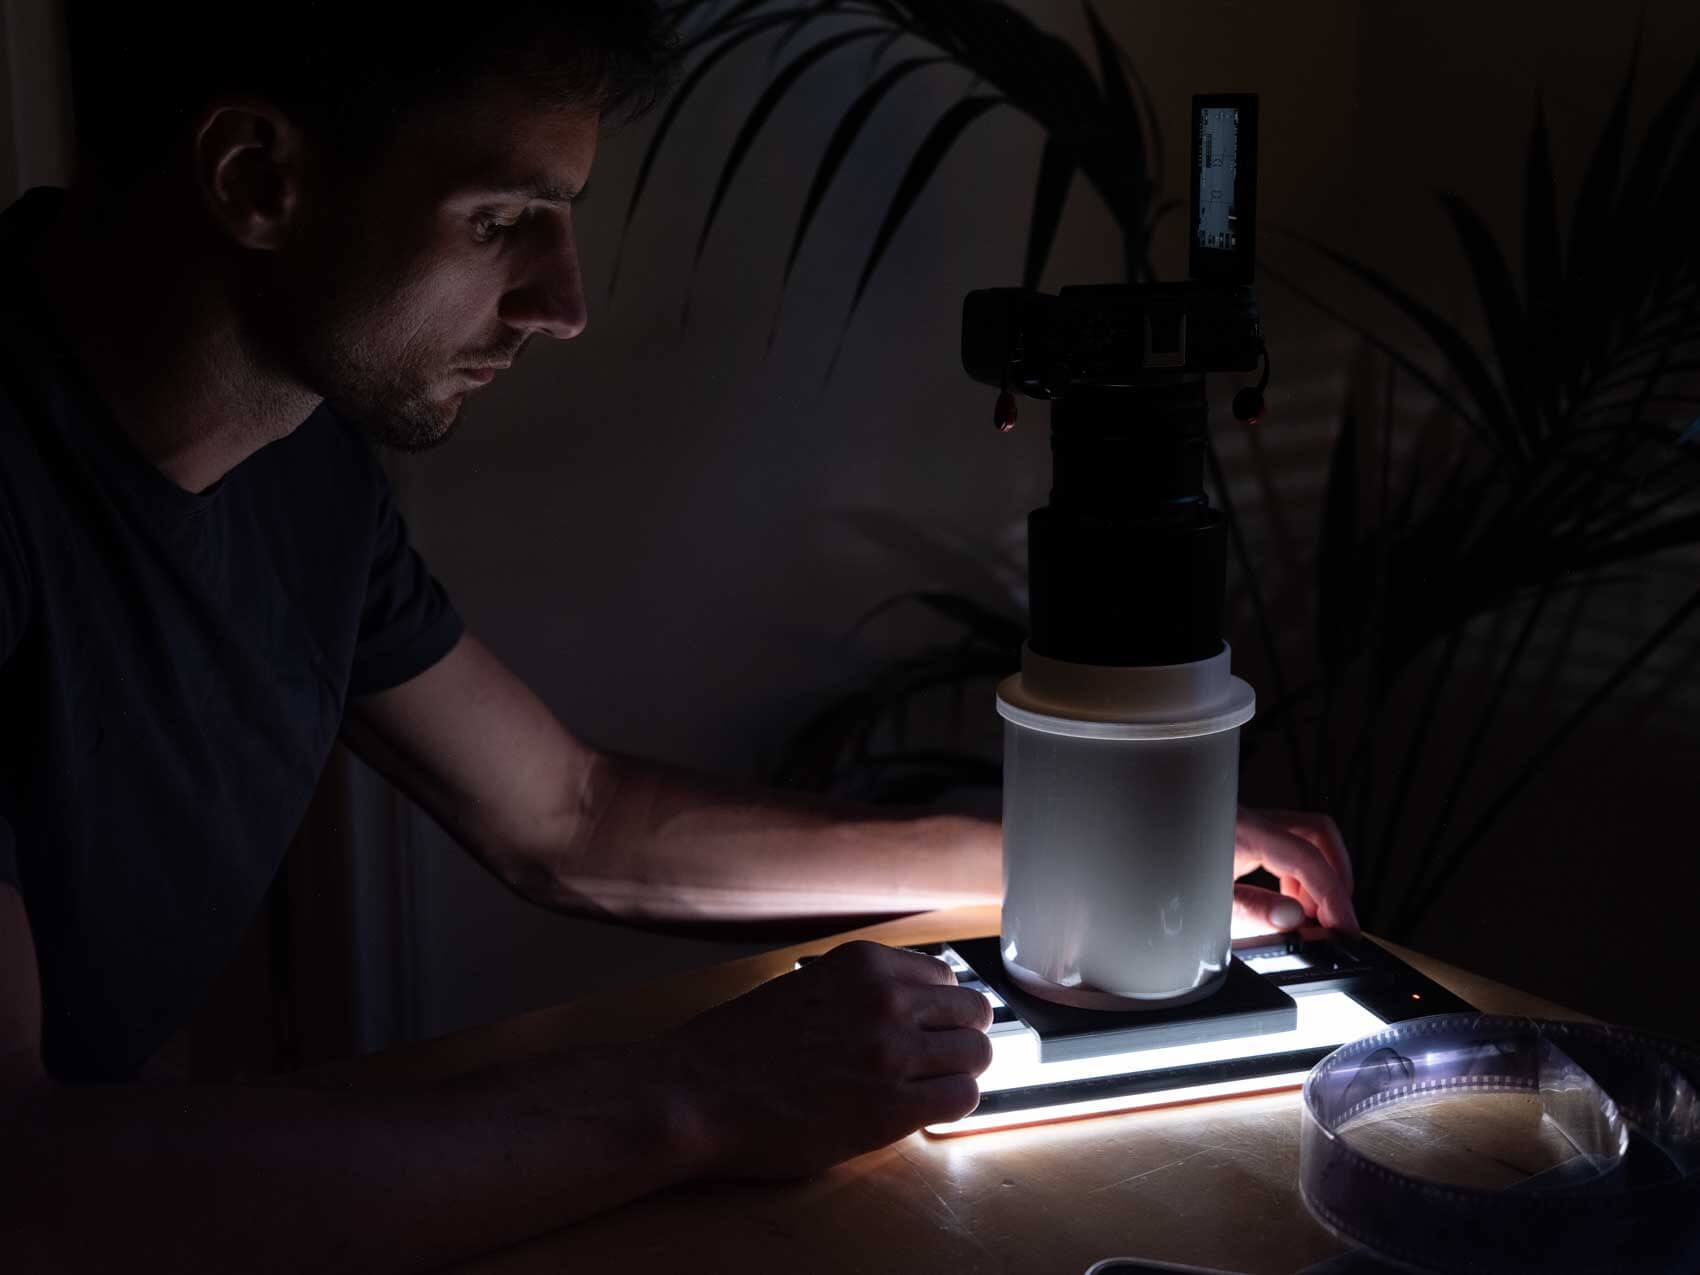
My Preferred Scanning Setup (Personal Story)
Over time, I built my own DIY camera stand to maintain consistency and avoid adjusting the camera distance for every roll. Initially, I used a Canon setup and 3D-printed my own holder. Later, I switched to a Fuji camera and extended the stand to fit the new sensor size.
My setup allows me to slide the film holder directly under the camera. It blocks out stray light, enabling longer exposures without interference. While commercial setups work well, I find many to be overpriced. My DIY rig provides flexibility, stability, and excellent results.
Basic Post-Processing & File Management for scanned film
Quite crucial and often forgotten is naming conventions. Once you have taken all your photos, you might want to make sure you don’t forget which film it was taken with etc. For that reason, over time and many iterations I use the following naming convention:
Film type - ISO - Shoot name
This allows you to at any point in time recall the film type and ISO, without needing to grab the actual film to look it up. In case you use different types of cameras or lenses you can add more variables to your naming convention. I would expand to:
Film type - ISO - Camera - Lens - Shoot name
After scanning, I adjust exposure to balance highlights and shadows before conversion. Remember: when working with negatives, adjustments are inverted—highlight tweaks affect shadows, and vice versa.
For conversion, I use Negative Lab Pro, which consistently delivers the most accurate and natural colour results. I have tried a variety of conversion software and Negative Lab Pro tends to give the most consistent results with the best colour accuracy.
Troubleshooting & Common scanning Mistakes
Scanning 35mm film comes with a lot of variables and with that some common mistakes can occur.
Crooked scans
We tend to focus on a few things, but not very often do we focus on aligning the film with the camera. When this is not done, we need to add another step to post-processing to ensure alignment. Ensure alignment between your film and camera. Do it once properly.
Uneven lighting
Depending on the light box, the light can be uneven. When the lights are around the edges, the light fades off. This can negatively affect your scans. One side can become lighter than the other, the difference might look minimal, the effect of it on a large print can be noticeable. Ensure to place your film in the centre of your light box to achieve the best results.
Dust and hairs
Not cleaning the light box or film properly before scanning will result in lots of dust and hair spots on the image, which all needs to be removed in post production. You might not notice it while scanning, but once enlarged on a screen, every speck becomes obvious.
Colour cast
When scanning make sure the white balance is set properly, otherwise the colours might look completely different after converting it. It is a small thing and whilst shooting in RAW it can be fixed in post.
Under/over exposure
Under and over exposure often happens and can negatively affect your final image. When trying to adjust this after converting, it will alter the image quality in a negative way. Therefore it is important to make sure you set the right camera settings before proceeding with scanning the entire roll. When this happens consistently across multiple rolls it might be worth checking your light meter.
Curved scans
Panoramic images are great, but scanning them requires a larger film holder, which often results in more potential curving of the film. Due to sitting in a circular contained for a long time and the development process, the film tends to curve to one side. Although completely normal (and admittedly annoying), it helps to flatten your film for a few days before scanning. This significantly helps with reducing the amount of curving the film might do whilst in the film holder.

Archiving & Long-Term Preservation
When you have scanned all the film and are ready to forget about the images, it is important to store Once scanned, store your negatives carefully. Use acid-free sleeves and keep them in a cool, dark place. Light, heat, and humidity accelerate deterioration. For maximum safety, maintain both physical and digital backups on a hard drive and in the cloud. See the full how to archive film article for more details.

Keeping Your Panoramas Alive
I often postpone scanning until I can do it in bulk. The delay brings small surprises, which is rediscovering forgotten frames.
Scanning your film at home is more than just a way to save money, it is a chance to take full control of your negatives and make minor adjustments where necessary. Make sure to carefully inspect your film after retrieving it from the lab and before scanning them. Ensure that you are working with a clean setup, and the right gear that delivers consistent quality. All of this makes sure that you will only have to touch your negative once before you have a digital copy, unless you want a higher quality scan at a later point in time.
Whether you’re archiving for the future or preparing for a print, scanning at home lets you revisit your images on your own terms. If you haven’t tried it yet, experiment with your own setup. The reward is not just a digital copy, but the satisfaction of shaping your entire analogue journey.
If you scan your own panoramic film, I’d love to hear about your setup. What has worked best for you? Share your workflow or lessons learned in the comments below.


